It’s Tuesday, so it should be a Tuesdays With Dorie post, but right now I have graham crackers. The Tuesdays With Dorie dessert this week is Low and Lush Chocolate Cheesecake (the recipe is here on Tea and Scones), which will be made and posted later this week (we have permission to post late this week). Since I’m not a big cheesecake fan, I decided to make some graham crackers for the one I’m making for Josh so I would have a yummy treat this week too. I’m going to hold off on the EDR right now, as I was far too tired, hungry, and busy making dinner when I baked these tonight. They taste wonderful, though, and I’m sure they’ll be an excellent base for the cheesecake. The recipe is from Martha Stewart’s Cookies and can be found here on her website (I used a cookie cutter instead of trimming them with a pastry wheel and forgot to pierce them with a fork). I hope everyone had a great holiday and that you all are enjoying the last few days of 2009.
Dorie calls this week’s treat “My Favorite Pecan Pie.” I have to say, I generally like the idea of pecan pie better than the finished product. I mean, I like pecans and always think the pie will be yummy, but the proportion of nuts to sweetened gelatinous matter is often very disappointing. Not this one, though. Dorie decreases the sugar and amps up the flavor with cinnamon, espresso powder, and chocolate. I learned from making Dorie’s Cinnamon Squares what a marvelous combination those flavors are and they did not disappoint in this pie. And bonus: it’s actually really easy to make! You do have to plan a little bit ahead to make pie dough, but the filling comes together in a matter of minutes and requires only one bowl – awesome!
We rated this recipe a solid 9 for Deliciousness and a 3 for Effort, giving it an EDR of 3. Many thanks to Beth of Someone’s in the Kitchen with Brina for selecting this delectable pie. You can find the recipe on Beth’s site and stop by the Tuesdays With Dorie blogroll to see what the other bakers thought of this treat. Due to Christmas, it’s whatever day of the week we want with Dorie, though, so many will probably post later in the week. This would definitely be a wonderful Christmas dessert and I am slightly tempted to make it again.
Last week I mentioned some shortbread cookies I had baked for Secret Baker. Secret Baker is the collaborative idea of three fabulous baker/bloggers, Sarah of Blue Ridge Baker, Margaret (aka Tealady) of Tea and Scones, and Tracey of Tracey’s Culinary Adventures. They decided that since we all see and hear about what goes on in each others' kitchens, it was time we actually got to try some of the concoctions. Much like Secret Santa, you are randomly assigned someone to bake for and in turn, a mystery box of baked goods will arrive on your doorstep. Awesome, right? Sarah hosted the first round and there is a write-up about it here on her blog, and Margaret hosted this month and I’m sure she’ll have a round-up on her blog soon. The theme for this round was Christmas cookies. I did make shortbread and gingersnaps, but I thought it would be fun to make a candy as well.
Not long ago, the Sweet Melissa baking group made toffee. The recipe in the Sweet Melissa book gave me, as well as many of the Sweet Melissa bakers, a number of difficulties; I attempted three batches before I concocted one worth eating. It was yummy, though, and I knew I wanted to make more toffee this holiday season. Lucky for me, one of my fellow bakers, Joy of Hot Oven, Warm Heart, posted a different recipe the week the group made toffee, after burning a batch of the Sweet Melissa toffee herself. The recipe she used was David Lebovitz's , which can be found here on his site. I definitely recommend checking out his post, as it has a lot of tips on candy-making.
There were a couple things I did differently this time. David’s recipe did not specify how hot the stove should be, so I channeled my best caramel-making experiences and left it on medium. I figured I would rather have it be slow and steady than risk burnt candy again. Also, after always using the inexpensive, easily shatterable, and prone to fogging up so much you can’t read the temperature candy thermometers from the grocery store, I finally upgraded slightly with this one from Sur La Table and it seems good so far. The Secret Baker participants list their allergies and aversions, and the person I was baking for, Kayte, of Grandma’s Kitchen Table, said that the guys in her house do not like nuts “in” things, just on top or bottom of, so I only used half the nuts in the recipe, on the chocolate part, since when I made toffee before they sort of sunk in.
Josh and I thought the toffee was excellent, and Kayte informed me the guys over at Grandma’s Kitchen Table loved it, too. I rate this recipe a 9 for Deliciousness and a 2.5 for Effort, for an EDR of 3.6. A great last minute gift or snack to have around for the holidays! Oh, and above is a photo of the treats I received from my Secret Baker. The box was packed with a plethora of delicious goodies; there was no note, though, so the baker is still a secret to me!
2 cups (8 ounces) toasted almonds or hazelnuts, chopped between 'fine' and 'coarse' 2 tablespoons water 1/2 cup (1 stick) salted or unsalted butter, cut into pieces a nice, big pinch of salt 1 cup granulated sugar 1/4 cup packed light brown sugar 1/4 teaspoon baking soda 1 teaspoon vanilla extract 5 ounces bittersweet or semisweet chocolate, chopped, or 1 cup chocolate chips optional: Ground cocoa nibs and fleur de sel
Lightly oil a baking sheet with an unflavored vegetable oil. Alternatively, use a 9”x9” square baking pan, line with a parchment paper sling (about 2 inches hanging over the sides) and spray with cooking spray. Sprinkle half the nuts into a rectangle about 8”x 10" on the baking sheet or the entire 9”x9” baking pan. (Or for a less nutty toffee, skip the nuts on this layer.)
In a medium heavy-duty saucepan fitted with a candy thermometer, heat the water, butter, salt, and both sugars. Cook, stirring as little as possible, until the thermometer reads 300 F degrees. (The recipe did not specify what temperature the stove should be on, so I left it on medium heat for about 10 minutes, then nudged the dial up just a bit and it reached temperature.) Have the vanilla and baking soda handy. Immediately remove from heat and stir in the baking soda and vanilla. Quickly pour the mixture over the nuts on the baking sheet or pan. Try to pour the mixture so it forms a relatively even layer. If necessary, gently but quickly spread with a spatula, but don't overwork it. Strew the chocolate pieces over the top and let stand 2 minutes, then spread in an even layer with an offset spatula.
If using, sprinkle with a small handful of cocoa nibs and a flurry of fleur des sel. Sprinkle the remaining nuts over the chocolate and gently press them in with your hands.
Cool completely and break into pieces to serve. Store in an airtight container for up to ten days.
The Tuesdays With Dorie bakers lucked out with two cookie recipes in a row this month. Don’t get me wrong, I do have a lot of fun making (and eating) the fancy desserts, but can never say no to cookies. This week’s concoction is Café Volcano Cookies, which consist of merely five ingredients and are a member of the meringue family. Mine, however, did not puff much at all – oops. I had used the last of my espresso powder making cheesecake the previous week and failed to replenish my supply, so I was happy to see on the Problems & Questions section that cocoa powder was a good substitution (I have pounds of that, thanks to a couple of over-enthusiastic internet purchases). So that is why my cookies look very dark, though admittedly they were also a little bit overdone.
I asked Josh what he thought of them and this was his reply, “they’ll get eaten, but I won’t request them again. The dough to stuff ratio is too low for me.” He hadn’t seen me bake them, so he didn’t realize there was neither flour nor butter in them. I also caught him feeding a piece to Eloise before he remembered they have chocolate, so I guess that’s what he meant by “they’ll get eaten.” I will admit they’ve grown on me a bit, and I definitely like the idea of a dairy and gluten-free cookie. If I ever make them again, I would not toast the walnuts, as I found the flavor overpowered the yummy almonds and chocolate. And though not a huge hit, I would consider making a variation of this recipe again.
This recipe rated a 7 for Deliciousness and a 2 for Effort, giving them an EDR of 3.5. Many thanks to MacDuff of The Lonely Sidecar for an easy yet interesting choice. You can find the recipe here on MacDuff’s site and visit the TWD blogroll to see what the other bakers thought of these cookies.
It was a gray and rainy morning on Saturday (and for the better part of the weekend, actually), which made me crave something warm and comforting for breakfast. I had starred some gingerbread pancakes in my Google Reader a while ago and decided it was the perfect morning to make them. Unfortunately, though scrumptious, they weren’t terribly pretty and I didn’t photograph them (we also devoured them rather quickly). Though I hope to make them again before the holiday season is over, it may not happen, so click on over to this recipe on Baking Bites for some fantastic Gingerbread Pancakes (I recommend upping the spices and subbing some whole wheat for white flour). Josh and Eloise would tell you the pancakes were the best idea I had all weekend, much better than my idea to go running in the rain.
I’m not going to leave you without a recipe and a picture of my wet dog. Another yummy comfort food I’ve been making recently is Pasta with Garlic and Oil; if you want to be fancy it’s called “Aglios E Olio”. In our house we refer to the dish as “garlic noodles.” It’s easy, delicious, and inexpensive to make – win-win-win! We won’t bother worrying about the nutritional content. Mondays are often rough for me, so it’s nice to have a simple and satisfying meal like this one at the end of the day. Before you proceed, I will warn you that you must love garlic, ‘cos there’s a lot in this recipe! This recipe received an 8.5 for Deliciousness and a 2 for Effort, giving it an EDR of 4.25.
Pasta with Garlic and Olive Oil (Aglio E Olio) from Cook’s Illustrated Italian Favorites (printable recipe)
1 pound spaghetti or noodles of your choice Table salt 6 tablespoons extra-virgin olive oil 20 medium garlic cloves from 1-2 heads, minced or pressed through a garlic press (about ¼ cup) ¾ teaspoon red pepper flakes 3-4 tablespoons fresh parsley leaves, finely chopped 2 teaspoons juice from 1 lemon 1 ounce grated Parmesan, about ½ cup (optional)
Adjust the oven rack to lower-middle position, set large heatproof serving bowl on rack and heat oven to 200 degrees. Bring 4 quarts water to boil, covered in large Dutch oven or stockpot. Add spaghetti and 1 ½ teaspoons salt to boiling water, stir to separate pasta, cover and cook until al dente; reserve 1/3 cup pasta cooking water and drain pasta.
While water is heating, combine 3 tablespoons oil, 3 tablespoons garlic, and ½ teaspoon salt or sea salt flakes in heavy-bottomed nonstick 10-inch skillet; cook over low heat, stirring constantly, until garlic foams and is sticky and straw-colored, 10 to 12 minutes. Off heat, add remaining tablespoon of garlic, red pepper flakes, parsley, lemon juice, and 2 tablespoons pasta cooking water to skillet and stir well to keep garlic from clumping.
Transfer drained pasta to warm serving bowl; add remaining 3 tablespoons olive oil and remaining reserved pasta water and toss to coat. Add garlic mixture and ¾ teaspoon salt or 1 teaspoon sea salt flakes to pasta; toss well to combine. Serve immediately, sprinkling individual bowls with Parmesan, if desired.
Recipe notes: I chop half the garlic with a knife and mince the rest with a garlic press, so there are varying size pieces. The recipe recommends sprinkling toasted bread crumbs over the pasta, which I think would be excellent (extra carbs!), but I haven’t had any on hand when preparing this.
When I first started reading though Baking, one of the things I immediately enjoyed about it was that in addition to the fancy desserts, it is packed with simple but special recipes, which you can make from basic pantry staples. One that immediately caught my eye was the Sable recipe, which was described as a French shortbread (sounds so much more enticing than “butter cookie”) and is accompanied by a gorgeous photo. Anyway, it was one of the very first recipes I made from “the book” and I was happy to make it again when it was selected for Tuesdays With Dorie this week. Dorie offers a number of different flavor combinations in the “playing around” section of the recipe, and since I had made the basic cookie recipe the first time around, I was tempted to try one of the citrus or spice versions. Josh voted for plain butter, though, and I count on him to consume the larger percent of baked goods in this household, so I went with that one.
And yum! I’d forgotten what fantastic cookies they are; they are sturdier than a traditional shortbread, which coincidentally, I made a batch of for Secret Baker this weekend, and delightfully buttery. It has gotten quite cold (for California) this week and I really didn’t feel like running tonight; I just wanted to sit inside and eat these cookies – they’re that good. This recipe rated an 8 for Deliciousness and a 2 for Effort, giving it an EDR of 4. Many thanks to Barbara of Bungalow Barbara for a great selection. You can find the recipe here on Barbara’s site, as well as lots of lovely cakes and great information about baking. And stop by the TWD blogroll to see what other variations people made.
Here is a photo the shortbread I made for Secret Baker. The recipe can be found here on the Cook’s Illustrated site. I sampled one for quality control and they’re really good too!
This week’s Sweet Melissa Sundays treat is Chocolate Espresso Cheesecake with (or in my case without) Blackberry Glaze. It comes from the “Sunday Supper’s Grand Finale” section of the book and it is the group’s grand finale for 2009. We’ll be taking a short break for the holidays and returning in January. I am not a huge fan of cheesecake, but they’re generally appreciated by others and I knew Josh would be seeing his friends this weekend, so I made an entire recipe. This recipe revealed a couple deficiencies in my seemingly well-equipped kitchen. It was meant to be baked in an 8-inch springform pan, which I don’t have. I was going to scale up the recipe a bit and bake it in my 9-inch springform pan, but then I realized I didn’t have a roasting pan that would fit the 9-inch pan for its water bath, so I made cheesecake bars instead. This ended up working really well, since bars are more portable and I didn’t have to worry about water leaking into my pan, since they were baked in a standard 8x8 square pan (with 1.5 times the amount of crust) rather than a springform pan.
I have to say, I think this is a contender for “richest recipe I’ve ever made.” Seriously: a chocolate crust, chocolate on top of the crust, and half a pound of chocolate in the cheesecake, not to mention a healthy dose of cream. We ended cutting the cheesecake into 16 squares and even small squares seemed pretty intense. The recipe comes together fairly quickly and easily, but it does involve a bit of planning, as it bakes at two different temperatures (three if you count the initial baking of the crust), and then is supposed to sit in the oven for an hour after its second bake. I got as far as baking the crust on Friday night, then realized I would be up much later than I wanted to be if I continued the project, so the rest got left until Saturday. I actually had to defer the oven monitoring to Josh yesterday afternoon since I had an appointment, and he did a great job – the cheesecake baked and set perfectly!
I thought the crumbly chocolate hazelnut crust was superb, I might secretly scrape some cheesecake off a bar or two and just eat them as chocolate cookies. Josh liked the bars a lot and rated this recipe an 8.5 for Deliciousness. I give it a 3.7 for Effort, for an EDR of 2.29. Many thanks to Shandy of Pastry Heaven for selecting this decadent treat. You can find the recipe here on Shandy’s site and visit the SMS blogroll to see what the other bakers thought of this dessert.
Tuesdays With Dorie begins the month of December with Rosy Poached Pear and Pistachio Tart. Thanks to Josh’s brother, we have become acquainted with a very nice farmer. Amy runs the Petaluma Bounty Farm and, among other accolades, was featured in this article, “40 Farmers Under 40.” She knows I like to bake and on Thanksgiving she kindly gave me some pineapple quinces, which she thought I would enjoy. I had never worked with quinces before, but since they are a relative of pears, I figured I could use them for this tart. The quince were an excellent poaching fruit: they are not as hard and crunchy as apples, but have more give than pears, so they held up well and sliced nicely. I poached three large quinces and only made one tiny tart, so I will be making quince sorbet with the leftovers (and hopefully posting it).
Last month we had the privilege of posting the recipes out of order, and I will confess that I was a bit wistful for November, as this tart was a bit of a production to make just a few days after Thanksgiving, and I did not have the foresight to divide the labor up over a couple days. In addition to the fruit, there was pistachio pastry cream, a tart shell, candied pistachios, and a glaze made with the poaching liquid. The tart was really lovely, though, and though the pastry cream ended up being my least favorite part, it smelled amazing as the pistachios and sugar steeped in milk. I think the combination of textures in this tart may have been as good as the flavors, particularly the fruit and crunchy pistachios.
This recipe received a 7.5 for Deliciousness and a 4.5 for Effort, giving it an EDR 1.66. If I had a ranking for aesthetic appeal, this is a definite 10 – so pretty. Many thanks to Lauren of I’ll Eat You for selecting this dessert. You can find the recipe here on Lauren’s site and visit the TWD blogroll to see what the other bakers thought of this tart.
This week’s Sweet Melissa Sundays treat is Golden Almond Fruitcake. Melissa Murphy’s love of almonds seems pretty apparent. Throughout the book they are sprinkled in recipes, such as chocolate chip cookies and sticky buns, where you would typically find other kinds of nuts like walnuts or pecans, but this is a whole cake celebrating the nut with almond in four different forms: marzipan, whole almonds, almond flour, and almond extract. Melissa introduction to the recipe includes the anecdote that this recipe won the 2006 Marzipandemonium contest sponsored by the Almond Board of California. I’d like to know where to find out how to become a judge for that contest – sounds yummy!
Oh, fruitcake. It really has the reputation of being a totally inedible sweet, dense brick. I think what deters me from it are the little chunks of candied “fruit.” Luckily, this recipe uses regular dried fruit, which proved to be a great way to clear out some pantry reserves (I constantly have leftovers from various baking projects); I used apples, cherries, and apricots. The recipe gives a choice between using brandy or juice for the cake and glaze, and I used brandy, which made for a pretty boozy cake (this was two SMS Sundays in a row that had me opening a bottle of alcohol before 9:00 am). It was one of those recipes that was pretty simple, but between chopping the marzipan, fruit, and nuts and making almond flour, it took me a little more time than I thought it would. I have also been making mini loaves as opposed to whole loaves a lot lately, and forgot that large cakes always bake the full amount of time specified, if not longer. The result? It was a nice moist loaf cake, with tantalizing goodies in every bite. My one complaint was that the small amount of cardamom (1/2 teaspoon) masked some of the lovely almond flavor; I would definitely skip that ingredient if I were to make this cake again.
This recipe received a 7.5 for Deliciousness and a 3 for Effort, giving it an EDR 2.5. Many thanks to Karin of Sugar and Spice for selecting this holiday treat. You can find the recipe here on Karin’s site, along with her very special reasons for choosing this recipe -such a sweet and thoughtful story. To see what the other bakers thought, drop by the SMS blogroll.
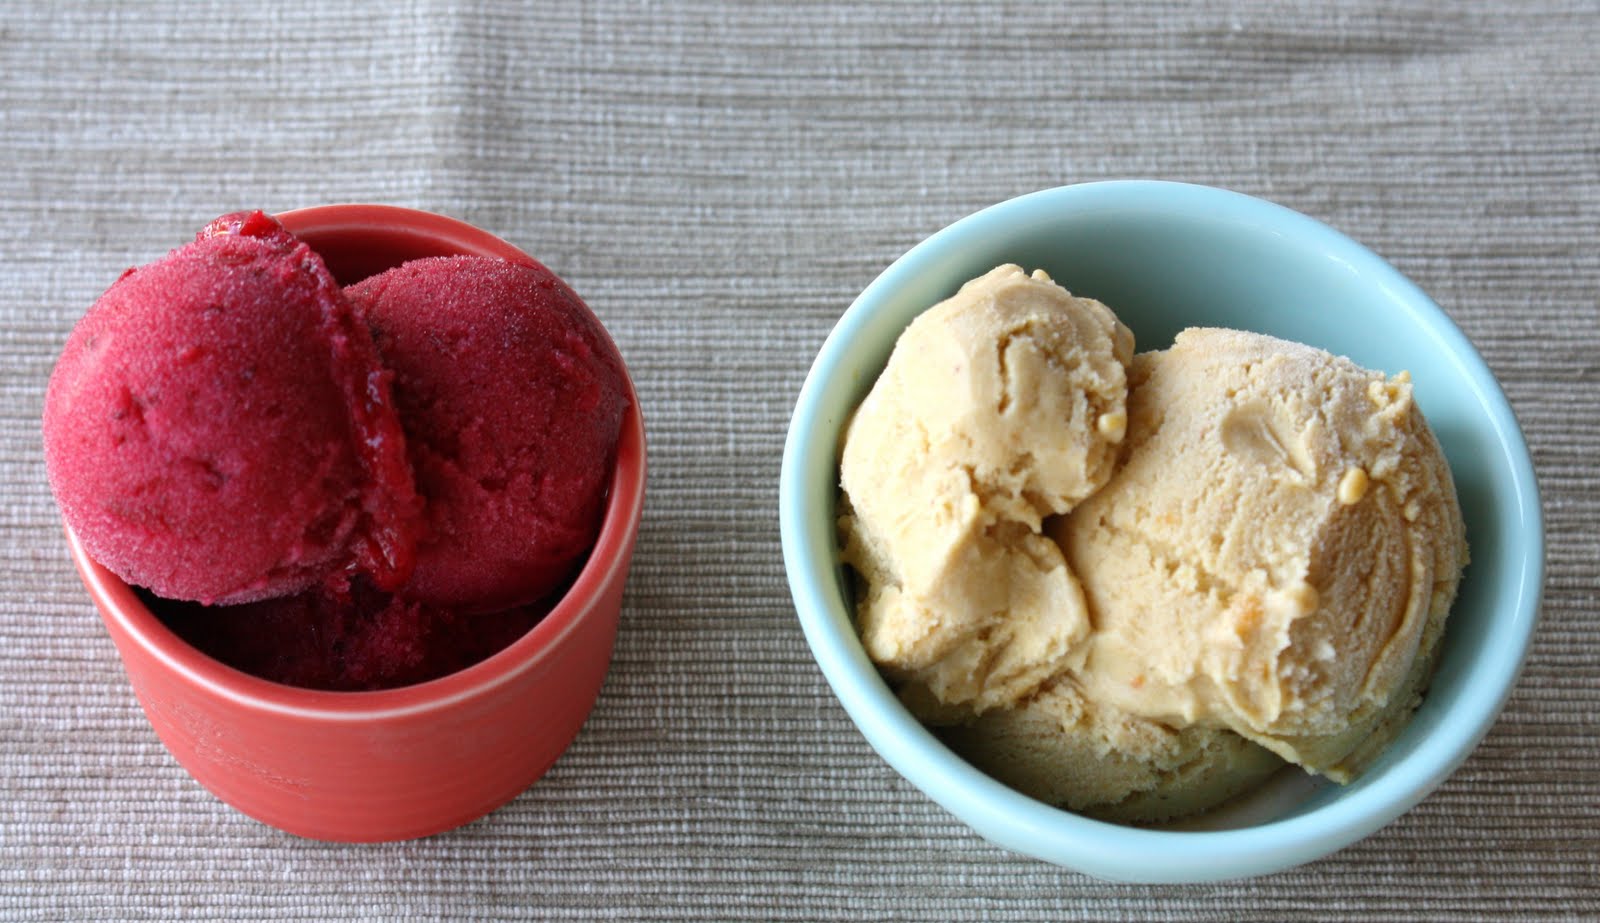
I’ve posted these types of frozen treat duos on here before: a healthy-ish fruit one and a more decadent creamy concoction. Today we have a Cranberry and Vanilla Bean Sorbet and Pumpkin Ice Cream. I meant to post these before Thanksgiving, but I never got around to it. Since I am actually not making anything at all today I figured I might as well do something food-related and post them now. (It really feels strange to not use my kitchen at all on a day off. And not only did I not make anything, I sat on the couch and watched second-tier reality shows for two hours and did not even knit while doing so. True holiday sluggishness – fabulous!) Besides, I’m sure I’m not the only one who has stockpiled a few extra cranberries and pumpkin.
As soon as I saw the recipe for Cranberry and Vanilla Bean Sorbet in the November issue of Bon Appétit, I knew it would have a date with my ice cream maker as soon as I could get my hands on some cranberries – which, luckily, I did just a couple days later. It was sometime in early October when cranberries are still scarce. Last year the cranberry urge hit a little too early and Josh drove to at least five stores to find them for me – one of the many reasons we’re happy to finally be a two car household. If you’re looking for a delectable yet light dessert and enjoy sweet/tart combinations, I highly recommend this sorbet. And the pumpkin ice cream? Everything you’d expect. I’ve always liked pumpkin pie cold with whipped cream, so this is perfect for a pumpkin pie craving. Or on top of another dessert. You can find the recipe for Pumpkin Ice cream here on David Lebovitz’s site.
1 12-ounce package fresh or frozen cranberries 2 ½ cups water 2 cups sugar ½ teaspoon coarse kosher salt 1 vanilla bean, split lengthwise ¼ cup fresh lemon juice Combine cranberries, 2 1/2 cups water, sugar, and coarse salt in large heavy saucepan. Scrape in seeds from vanilla bean. Add bean to mixture and bring to boil over medium heat, stirring until sugar dissolves. Reduce heat to low; simmer until cranberries pop and are soft, stirring occasionally, about 10 minutes. Cool to room temperature.
Remove vanilla bean from cranberry mixture. Working in batches, puree cranberry mixture in blender or food processor. Strain into large bowl; discard solids. Stir in lemon juice. Refrigerate cranberry mixture until well chilled, at least 4 hours or overnight.
Transfer cranberry mixture to ice cream maker and process according to manufacturer’s instructions. Transfer sorbet to container; cover and freeze.
Notes: the second time I made this, I forgot the lemon juice and it’s still delicious. In fact, I’m enjoying some right now. Both times I’ve made the sorbet, I’ve thought two cups of sugar sounded like a lot, even though cranberries are a very tart fruit. I’ve been too scared to reduce the sugar, but it could probably do with a quarter cup less. Also, if you don’t want to use a precious vanilla bean, a large tablespoon of vanilla paste will certainly work.
The final Tuesdays With Dorie treat for the month of November is an All In One Holiday Bundt Cake. It’s a cake that encompasses all holiday goodness in one cake: apples, pecans, cranberries, pumpkin, and ginger. I like the concept of making a dessert or dish with a lot of enticing ingredients, possibly on the side of excess, and hoping it works out. In fact, the same day I made this cake, I went out to dinner and there was a chicken breast with caramelized brussels sprouts, chestnuts, fall apples, and chestnut- potato puree on the menu – all things I like, but a lot on one plate. I ordered it, and the combination was fantastic, just like this cake!
This cake rated an 8 for Deliciousness and a 2.5 for Effort, giving it an EDR of 3.2. Many thanks to Britin of The Nitty Britty for selecting this fun, seasonal cake. You can find the recipe here on Britin’s site and visit the TWD blogroll to see what everyone else baked this week.
This week’s Sweet Melissa Sundays treat is Raised Waffles with Warm Brown Sugar Bananas. This week on the Sweet Melissa Sundays P&Q section, a lot of people mentioned they do not own waffle makers. We have two (and no blender), since Josh and I each happened to own one before we moved in together and we never use them – so I can see why people don’t bother to get them. I enjoy waffles, but if I’m making a sweet breakfast, I generally gravitate towards things of the muffin/coffee cake variety since they keep well and provide breakfast for a few days. Oh, and one of the waffle irons happens to be a Hello Kitty one. I loved Hello Kitty when I was a child. I used to save my allowance to buy trinkets at the “Hello Kitty store,” which was a actually just a regular toy store with a small Sanrio section (if you’ve ever been to one of those enormous Sanrio stores, you’d laugh what I considered a Hello Kitty store). My mom and I saw this waffle maker at Target just before Christmas several years back, and thanks to one of my brothers needing a last minute gift for me, I received it! The recipe specifically stated to use a regular waffle maker, not Belgian, so this was the more practical choice of the two for this recipe (yes, I said practical when talking about a Hello Kitty waffle maker).
I don’t specifically recall ever having a yeasted waffle, but this recipe was based on Marion Cunningham’s recipe, and my dad often cooked from her Breakfast Book when I was young, so I suspect some of the waffles I ate growing up had yeast. These are pretty simple to make, just mix all the ingredients except eggs and baking soda the night before, let batter sit overnight, then whisk in the last two ingredients when you’re ready for breakfast, plus make the banana sauce. The end result was puffy waffles, with a nice bit of chewiness from the yeast – breakfast bliss. Eloise’s dream of having a cat for breakfast came true when I gave her a waffle piece, without the sauce of course. The brown sugar bananas were delicious, though I do think a sauce containing butter, rum, brown sugar, and maple syrup is breakfast debauchery.
We rate this recipe an 8 for Deliciousness and a 2.5 for Effort, giving it an EDR of 3.2. Many thanks to Lauren of Fried Pickles and Ice Cream for selecting this recipe and reminding me how yummy waffles are. You can find the recipe here on Lauren’s site and see what the rest of the bakers thought via the SMS blogroll.
This week’s Tuesdays With Dorie treat is Sugar-Topped Molasses Cookies. Since I had ever-so-much to say about the chestnut cake last week, I will keep this one short and sweet. Besides, since we have been allowed to post out of order this month, I have seen these on many blogs (I think I may be one of the last TWD bakers to make them) and I think everyone knows how good they are now. Spicy, molassesy, and crunchy from the sugar – an excellent treat to fill your cookie jar during the cool months.
This recipe rated a 7.5 for Deliciousness and 2 for Effort, giving it an EDR of 2.75. Many thanks to Pamela of Cookies with Boys for choosing a great seasonal cookie. Drop by Pamela’s site to read her TWD post and for the recipe, which she kindly posted last week, and stay for the adorable photos of her boys and some nice healthy recipes. And to see what the other TWD bakers made this week, visit the TWD blogroll.
Today is National Bundt Day, which I was made aware of by Mary the Food Librarian and Bundt Queen of the food blog world. She celebrated with a thirty day blogfest called “I like Big Bundts,” posting a new Bundt cake each day – a seriously impressive feat! In addition to her 30 days of Bundts, Mary also selected this Classic Banana Bundt Cake for Tuesdays With Dorie, which we liked so much (and it’s so simple), I’ve already made a second time.
Since I enjoy Bundt cakes (not to mention music puns), I made a Bundt cake in honor of the “holiday.” My lazy side thinks Bundt cakes are really the ideal cake: since they are so pretty from being baked in ridged pans so you don’t have to fuss around with decorations and just require a simple glaze, if anything, for frosting. I wasn’t sure what kind of cake to make, but Josh’s mom called yesterday to let me know she had a lot of extra lemons from her tree. I’m not sure exactly what type of lemon they are, but they taste on the Meyer side of sweetness and are delicious, so we were happy to go pick them up to turn them into cake. Besides, lemon is a nice antidote to all the chocolate and autumnal desserts we’ve had recently. The recipe came from the Cook’s Illustrated website, but if you don’t have a subscription to their site, Google “Cook’s Illustrated Lemon Bundt Cake” and you’ll find it easily. This cake rated an 8 for Deliciousness and a 2.5 for Effort, giving it an EDR of 3.2.
This week the Sweet Melissa Sundays group made its second attempt at candy-making with Butter Toffee Crunch. I had initially planned on making a quarter recipe, as the original yields three pounds and it’s a little early to be making Christmas gifts. However, I ended up making three quarters of a recipe, in three different batches, because my first two failed! I have groused about making caramel before, and though I am starting to get a little better at making candy, things just didn’t work out for me yesterday. The first batch burned (I could smell it before the candy thermometer was close to the requisite 280 degrees), and then I took the second batch off too soon in fear of it scorching. The third and final batch might have been a little underdone as well, but after three attempts I was calling it a day. My mom is a first grade teacher and at Christmas time she always receives lots of gifts from students, including candy. I remember one year there was some highly addictive toffee; the final product reminds me of that toffee and it is actually disappearing pretty fast.
This recipe rated an 8 for Deliciousness and a 3.5 for Effort, giving it an EDR of 2.28. Many thanks to Kaitlin of Kait’s Plate for challenging me in the kitchen this weekend. Like me, Kait also participates in Tuesdays With Dorie, but I wasn’t acquainted with her blog until Sweet Melissa Sundays started and I really enjoy it! You can find the recipe here on Kait’s site and see how the other bakers fared by visiting the SMS blogroll.
I made another delicious chocolate/brown sugar concoction this weekend, and since there is very little chance I will get around to actually writing a full post about it, I thought I’d mention it now. I was browsing through my reader on Friday evening and I saw Thomas Keller’s Chocolate Chip Cookies, from the new Ad Hoc at Homecookbook, on Pink Stripes. I took Wendy’s advice and made the cookies that night! These I don’t know if they surpass the New York Times recipe as my favorite, since it’s been a while (too long) since I’ve made those, but these are excellent cookies! My cookies did not spread as much as I thought they should, so I'm not sure where I went wrong in that regard. They turned out crisp on the outside and soft in the center, almost as if they contain a gooey chocolate filling rather than chips. It had been a while since I’d used molasses sugar, and I’d forgotten what a wonderful depth of flavor it adds to cookies. Unlike the NYT cookies, they do not require a rest in the refrigerator, so you get instant CCC gratification – awesome! I did refrigerate some and bake them today, though, and I think those ones turned out exceptionally good. These cookies scored a 9.5 for Deliciousness and a 2 for Effort, giving them an EDR of 4.75. You can find the recipe here, and I definitely encourage anyone craving chocolate chips cookies to make them.
Last week I needed some gingersnaps to make gingersnap crumble for my Sweet Melissa Sundays recipe. One of the Tuesdays With Dorie recipes this month would have fit the bill just fine, and I would have, for pretty much the first time, baked ahead of schedule. Unfortunately, I am not always so practical when it comes to baking. I’d had my eye on the gingersnap recipe from Pure Dessert by Alice Medrich for a while and decided this was a good excuse to try them. I figured that a cookbook that focuses on “ingredient-driven” recipes would probably have a superb ginger cookie recipe and it did not disappoint at all. The cookies contain three kinds of ginger, and manage to be wonderfully flavorful without being aggressively spicy. Baked on the lower end of the baking time (10 minutes), they turn out perfectly thin yet slightly chewy. I thought I was going to have to freeze some, but we could absolutely not stop eating them. Initially we rated them a 9 for Deliciousness, but in the ginger cookie category I think they deserve a 10. These cookies are also easy to make, so they get a 2 for Effort, giving them an EDR of either 4.5 or 5 – excellent score either way.
My Gingersnaps, from Pure Dessert by Alice Medrich Printable Recipe
2 cups (9 ounces) all-purpose flour 2 teaspoons baking soda 2 teaspoons ground ginger 1 ½ teaspoons ground cinnamon ½ teaspoon allspice ¼ teaspoon salt 8 tablespoons (1 stick) unsalted butter, melted and just warm ¼ cup unsulphured or full-flavored molasses ½ cup sugar 1/3 cup (2.3 ounces) firmly packed brown sugar or light moscovado sugar 2 tablespoons finely minced or grated fresh ginger root 1 large egg ¾ cup (4 ounces) ginger chips or crystallized ginger, cut into 1/4-inch dice About ½ cup Demura or turbinado or ¼ cup granulated sugar for rolling
Position the racks in the upper and lower thirds of the oven and preheat oven to 350 degrees. Line the baking sheets with parchment paper or silicone mats.
In a medium bowl, combine the flour, baking soda, ground ginger, cinnamon, allspice, and salt and mix thoroughly with a whisk. Set aside.
Combine the warm butter, molasses, both sugars, fresh ginger, and egg in a large bowl (or in a stand mixer, fitted with the paddle attachment) and mix thoroughly. Add the flour mixture and ginger chips and stir until incorporated. The dough will be soft. I gave it a brief (hour or so) chill.
Form the dough into 1-inch balls (1/2 ounce of dough for each). Roll balls in the sugar and place them 2 inches apart on the baking sheets. Bake, rotating the sheets from back to front and top to bottom about halfway through the baking, for about 10 to 12 minutes, or until they puff up and crack on the surface and then begin to deflate in the oven. (I know it may be more time-consuming, but I always bake cookies one sheet at a time on the center rack, I find they are more consistent that way, but it could just be my oven.) For chewier cookies, remove them from the oven when at least half or more of the cookies have begun to deflate; for crunchier edges with chewy centers, bake a minute or so longer.
Slide the parchment sheets of cookies onto cooling racks or use and offset spatula to transfer the cookies, and cool completely. Stored in airtight container, gingersnaps keep for several days.
And since I’m on the subject of Pure Dessert, I made these Nibby Buckwheat Butter Cookies from that book back at the beginning of October(!) to go with the TWD Split Level Pudding and never got around to posting them. You know how when someone pronounces something you made “interesting” and you’re not sure how to take it? I would not be offended at all if I heard that about these. They had a lot going on for a small cookie: a nutty flavor and sandy texture from the buckwheat, with a bittersweet essence and crunch from the cacao nibs. I had to keep trying them to decide if I liked them, and ultimately I did. I don’t know if I’d make them again, but both buckwheat and cacao nibs are fairly new ingredients to me and I enjoyed working with them; I look forward to utilizing them in other recipes.
Nibby Buckwheat Butter Cookies from Pure Dessert by Alice Medrich Printable recipe
1 ¼ cups (5.6 ounces) all-purpose flour ¾ cup (3 ounces) buckwheat flour ½ pound (2 sticks) unsalted butter, softened ¾ cup sugar ¼ teaspoon salt 1/3 cup cacao nibs 1 ½ teaspoons pure vanilla extract
Whisk the all-purpose and buckwheat flours together in a medium bowl. In a separate medium bowl (or in the bowl of a stand mixer), beat the butter, sugar, and salt together for about a minute with either a spoon or electric mixer. Mix in the nibs and vanilla. Add the flours and mix just until incorporated (I felt a spoon worked well for this part). Scrape the dough into a mass, if necessary knead it with your hands a few times until smooth. Place the dough on a flat surface and shape into a 12 by 2-inch long. Wrap the log and refrigerate for at least 2 hours or overnight. When ready to bake, position the racks in the upper and lower thirds of the oven and preheat the oven to 350 degrees. Line two baking sheets with parchment paper or silicone baking mats.
Cut the cold dough log into ¼-inch thick slices. Place the cookies at least 1 ½ inches from each other on the baking sheets. Bake until the cookies are just beginning to color at the edges, 12 to 14 minutes, rotating the baking sheets from top to bottom and front to back halfway through the baking. Cool the cookies in the pans on a rack, or slide the liners off to free up the pans; let cookies cool completely.