 This week’s Tuesdays With Dorie treat was Vanilla Ice Cream – yay! As much as I love making different flavors of ice cream, it’s always convenient to have vanilla around, since it’s good on pretty much everything. In fact, this is the third variation of vanilla I’ve made this month. The other ones were Brown Sugar Vanilla Ice Cream for Sweet Melissa Sundays (twice) and David Lebovitz’s Philadelphia-style vanilla. I don’t think we’ve settled on a very favorite yet (I still must try David Lebovitz’s custard-based vanilla). We liked the extra depth of flavor in the brown sugar variety and the pure sweet cream of the Philadelphia-style, but if you’re looking for a decadently rich and creamy vanilla, make Dorie’s.
 I have to admit, I was skeptical, as the Honey Peach Ice Cream, the last flavor the group made from Baking, was not amongst my favorite ice creams of the summer. But when I smelled the vanilla bean steeping in the cream and then saw the custard quickly coating the back of my spoon, I was certain this would be excellent ice cream. And it was! I don’t often order desserts at restaurants; I’m usually too full right after eating a meal and also there is usually a surplus of desserts in my kitchen, however, I do make an exception for one place. In fact, I will go there just to get dessert! The name of the restaurant is called Picco, and the dessert is four mini chocolate malt milkshakes served with warm chocolate-filled madeleines (I did take a picture once and now I can’t find it). I decided to create my own vanilla version at home. It’s also good with brownies, specifically the Baked Brownies. Mr. Penpen even had some with one of the toaster tarts featured in my last post.
 This recipe gets a 9 for Deliciousness and a 2.2 for Effort, giving it an EDR of 4.09. Many thanks to Lynne of Café LynnyLu for introducing me to another great vanilla ice cream. You can find the recipe on Lynne’s site and see what the rest of the group thought via the TWD site.
 This is an exciting day around here: not only am I running a half-marathon (the second half of the San Francisco Marathon, to be specific) and attending a salsa-off, I am the hostess for Sweet Melissa Sundays this week. (I plan to take photos of the salsas and blog about the event later this week, if I can do anything besides replenish my carbs with chips and complain about how tired I am.) I will shamelessly admit that when I joined a second online baking group, I was pleased that I would get to select a recipe this year. I fear that by the time it’s my turn for Tuesdays With Dorie I will have been diagnosed with high cholesterol and need to be in an online diet group instead of two baking groups. Since my turn happened to land during the height of summer, I knew I wanted to take advantage of the glorious summer fruit available. At first I planned to select a pie, but a while ago we were given a chance to vote for a recipe; one of the recipes was Strawberry-Ruby Grapefruit Preserves. It lost the vote (hard to compete with chocolate chip cookies), but I became enthralled by the idea of making preserves, so I chose it.
 Then I got worried that making preserves may be terribly time-consuming and difficult (I panicked when another book I have listed the time commitment for strawberry jam as being 2-3 days), since, per usual, I waited until last minute to make the recipe. And guess what? It wasn’t. Making the preserves was incredibly quick and easy – chop fruit and cook. The canning process wasn’t nearly as arduous as I had anticipated, either, though it did involve using every burner on my stove and two people (I strongly recommend having a second set of hands around - lots of heavy pots and boiling water). I bought a Ball “Blue Book” (click here for their site) and some basic canning equipment – quite low start-up cost. I read the instructions in the canning book very thoroughly, made Mr. Penpen read the instructions very thoroughly, and followed them precisely. I will elaborate further on canning in another post, but it was a very satisfying project and I now have six little jars of Strawberry-Ruby Grapefruit Preserves to give away. (Maybe. I must keep at least one for myself.)
 The recipe yielded such an enormous quantity, that in addition to the jars, I had a nice little bowl to consume this weekend, which is great because I thought the preserves were outstanding, just the right sweet/tart combination. I gave this recipe a 9 for Deliciousness and a 2 for Effort, giving it an EDR of 4.5 (this does not include canning, though, that would make the Effort higher). I made Toaster Tarts from my newish cookbook, Jam It, Pickle It, Cure It And Other Cooking Projects – definitely recommend this one, again, it’s proving to be tremendous fun.
 Thanks to everyone in the group for preserving along with me this week, I am looking forward to seeing some jammy goodness and how everyone else used their preserves. The recipe is below and for a printable version, click HERE. Though seriously, if you don’t have The Sweet Melissa Baking Book, get it, it’s great! And be sure to check out the SMS blogroll to see what the rest of the group thought of the preserves.
 Master Preserve Recipe, from page 165 - 166 of The Sweet Melissa Baking Book8 cups peel and sliced ripe fresh fruit of your choice (2 dry quarts)2 cups peeled and cubed Granny Smith apples (2 to 3 apples cut into ¼ to ½ inch pieces)2 cups sugar¼ cup fresh lemon and/or orange juice2 tablespoons freshly grated citrus zestIn an 8-quart heavy-bottomed saucepan over medium heat, combine the fruit, apples, sugar, juice, and zest. Cook, until the mixture reaches 212 degrees Fahrenheit on a candy thermometer, stirring often to prevent scorching. You may mash the fruit slightly with a potato masher, if necessary. Once the preserves have reached 212 degrees, continue to cook for 30 minutes more, stirring often, until thick. You can check the consistency by placing a dollop on a plate and setting it in the freezer until just cool. If it is runny, continue cooking; if it is thick, you’re good to go.Can the fruit in clean canning jars as directed by the manufacturer, or cool to room temperature, tightly cover, and refrigerate for up to 2 weeks, or freeze up to 6 months.Strawberry-Ruby Grapefruit PreservesUse 2 quarts strawberries, hulled and sliced, and the grated zest and juice of 2 ruby red grapefruits.
 I’ve always like the idea of sorbet, as it’s a fat-free frozen dessert option and inherently light and refreshing. Unfortunately, I usually find the ones from the grocery store overly sweet and flavorless. Then last winter I tapped into the sorbet section of The Perfect Scoop and have been hooked ever since. I was about to write that my favorite to date has been this pineapple one I made last weekend, but then I remembered how much I loved, not to mention how many times I made, tangerine-meyer lemon sorbet last winter. And pink grapefruit-champagne. Anyway, I’ll call the pineapple my favorite summer flavor. I think it’s the texture that makes this dessert so delectable; it’s much creamier than most sorbets I’ve had. This recipe is definitely worth the time it takes to cut up a pineapple, which really isn’t that long. This recipe gets a 9 for Deliciousness and a 2 for Effort, giving it an EDR of 4.5. Click HERE for a printable recipe. But if you have an ice cream maker and not the The Perfect Scoop, I recommend the investment.
 I made the pineapple sorbet last Saturday, and I had to make it again on Thursday night for two reasons: 1) I loved it and it went really fast and 2) My boyfriend made mint chocolate chip ice cream, and I needed a healthier dessert option to prevent myself from gobbling it up. The recipe for the mint chocolate chip ice cream came from “The Weekly Scoop” feature of My Baking Adventures. I had printed the recipe out on Monday, but probably wasn’t going to get to it until at least Wednesday. Since we had been out of ice cream for about two days (a real famine), Mr. Penpen took it upon himself to make it on Tuesday evening. The mint chocolate chip rates a 10 for Deliciousness and a .5 for Effort (I had to go downstairs twice to locate ingredients for him), giving it an EDR of 20 – off the charts. Click HERE to get the recipe from Megan’s site; this is truly great ice cream.
 This week’s Tuesdays With Dorie selection was Raspberry Blanc-Manger (Dorie even gives us the correct pronunciation, “blah-mahn-jhay,” but I keep saying it incorrectly). It is in the “spoon dessert” category of Baking, and the main ingredients are cream, raspberries, and ground almonds. I had never heard of a blanc-manger until this week, but I generally enjoy desserts that contain raspberry and/or cream, so it wasn’t a hard sell. The alluring photo that accompanies the recipe in the book didn’t hurt, either. I baked a bevy of treats for various events last weekend; unfortunately, the elegant blanc-manger didn’t seem appropriate for any of them, so I didn’t get around to making this until Monday evening. Luckily, it was a painless enough recipe to put together on a weeknight. I did have a little pre-emptive jelling, but nothing a little extra milk couldn’t fix – I think, anyway, I’m not totally positive my blanc-manger turned out quite as firm as it should have.
 I tried a bite of the dessert after its photo shoot this evening and my boyfriend ate a small slice of it. The crunch from the almonds was a nice contrast to the fluffy cream and luscious berries. As I write this, Mr. Penpen is tucking into his second round of the dessert and says it's growing on him. We concurred that it deserves a 7 for Deliciousness and I gave it a 2.5 for Effort, giving it an EDR 2.8. I think I would really enjoy this dessert served alongside some crispy chocolate wafers; it didn’t seem quite substantial enough on its own, which may be because mine didn’t firm up enough. Many thanks to Susan of Sticky Chewy Creamy Gooey for two things: selecting this lovely seasonal dessert and posting THIS great tutorial about printable recipes on the Food Blog Alliance. You can find the recipe for blanc-manger HERE on Susan’s site and check out what the rest of the group thought by visiting the TWD site.
 This week’s Sweet Melissa Sunday treat was Whole Orange-Poppy Seed Cake. Much like the Tartest Lemon Tart Tuesdays With Dorie made a couple months back, this recipe utilizes an entire citrus fruit, which gets pulverized in the food processor. Though I had fun making the lemon tart, I didn’t like the dessert all that much, so I was glad to have another opportunity to make a treat with this somewhat unusual method. I decided to make muffins rather than a cake for dual purposes: getting breakfast ready faster and being able to bring the leftovers to work tomorrow. The recipe yielded twelve large muffins, which took twenty-two minutes to bake, and twelve minis, which took about fifteen minutes. I also reduced the butter a bit. The recipe called for a stick and a half: I used one stick and four tablespoons of nonfat plain yogurt. I think Dorie Greenspan’s French Lemon Yogurt Cake is spectacular and figured a little yogurt wouldn’t harm this citrus concoction, either.
 I am happy to say that I enjoyed this cake. It was moist and light, with pleasant bursts of orange flavor. (My dog liked it too. I carelessly left the plate from the photo shoot unattended for two entire minutes and when I came back into the kitchen, two of the large muffins and four of the mini muffins were missing.) I gave this recipe a 7.8 for Deliciousness and a 2 for Effort, giving it an EDR of 3.9. Many thanks to Melissa of Lulu the Baker for selecting this great and easy (very welcome this week) recipe. You can find the recipe here on her baking site and be sure to check out her adorable Etsy shop as well. To see what the other SMS bakers thought of the recipe, visit the SMS blogroll.
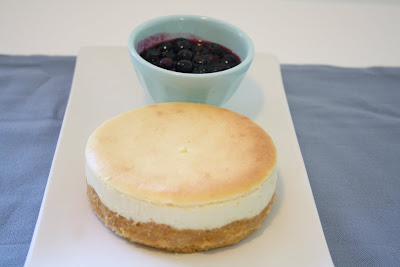 And I still need to catch up with my posting for last week’s SMS recipe, which was Lemon Blueberry Cheesecake with Cornmeal Crumble Crust. I was out of town, so the cheesecake was baked, photographed, and consumed two weeks ago. I had good intentions to write up my post before I left, but there’s always a few things that fall by the wayside right before a trip and the post was one of them. Mr. Penpen was happy one of those things wasn’t the huge tray of lasagna I left for him to eat while I was gone. Anyway, we’re not huge cheesecake fans around here (I mean, you can’t really pair cheesecake with ice cream), but the combination of lemon and blueberries sounded appealing, so I figured I’d give it a try. I skipped the cheesecake TWD made in December and decided that as long as I was making one mini cheesecake, I may as well make a second and try Dorie’s.
 I brought the cheesecakes to Mr. Penpen’s parents’ house on the Fourth of July – along with some other goodies – and they were quite well-received. I preferred the lemon blueberry cheesecake (especially the sauce – yum!) and Mr. Penpen liked the more traditional cheesecake. A big thank you to Eliana of A Chica Bakes for getting me to try something new. You can find the recipe for the lemon cheesecake on her site. Oh, and since I had leftover filling from both cheesecakes, so I supplemented them with remnants of other dairy products and some more lemon zest, mixed it up, and ran the mixture through my ice cream maker. I think the accidental cheesecake ice cream may have actually been the favorite of the three!
 Several weeks ago I had the chance to attend an author event at the wondrous Omnivore Books on Food (I've been on their email list for a while and have missed out on some cool events, so I was happy to finally make it to one). The author was Karen Solomon, and she was talking about her awesome new book,Jam it, Pickle it, Cure it, And Other Cooking Projects. Karen refers to the recipes in the books as “DIY kitchen crafting projects,” which is certainly an apt description for endeavors such as making your own cheese, bacon, and peanut butter cups. The book is jam-packed with intriguing and scrumptious-looking projects, with very detailed instructions (and time commitments) for the various processes. I highly recommend checking it out.
 I decided to start with a simple and practical recipe: crackers! I love artisan crackers, but they’re rather expensive, so I am delighted I can now make them at home with ingredients that are always in my pantry. The cracker dough is very easy to work with (I had no problem rolling it before it chilled) and you can vary the mix-ins or toppings to your taste. I used a ruler in an attempt to make straight lines and even crackers– not terribly successful – and sliced them with a pizza cutter. Both times I’ve made these, I’ve used the basic cracker recipe with olive oil rather than canola for a slightly richer cracker and topped them with seeds; I’m also anxious to try the cheese version. You can find a printable version of the recipe HERE. I gave this recipe an 8 for Deliciousness and a 2.5 for Effort, giving it and EDR of 3.2.
 Happy Thursday! I returned from visiting my brother and his girlfriend in Boston Tuesday afternoon, so I started my TWD recipe that evening and finished it Wednesday morning. I had this sweet idea that I would bake the selected brioche tart for my family (my mom was also there) while I was on vacation, but nice weather and a fun city are hardly conducive to baking and blogging, so it didn’t happen. It was kind of nice to have a break, actually. Quite surprisingly, I ran quite a bit while I was on vacation, which is usually the first thing to go. Lucky for us, another family member did bake! We went to Connecticut (as a Californian, I think it’s cool that you can state-hop so easily in New England) to visit relatives, and my multi-talented and incredibly hospitable aunt had prepared a splendid summer dinner for us, including a blueberry pie! I’d been wanting to bake something with blueberries for a couple weeks now (Mr. Penpen’s mother sent me home with blueberries and some yummy-sounding recipes on the Fourth and I just ate the blueberries for breakfast) and this pie definitely satisfied the craving! I gave my aunt’s pie a 10 for Deliciousness and 0 for Effort. I can’t think of a better dessert on a summer evening, particularly when it’s been baked by someone else and eaten with family. I think I’m going to have to make one myself soon, though, Mr. Penpen just saw the pie photos from my trip!
 The baking vacation ended within hours of getting off the plane, though. I’ve mentioned before, I’m a yeast bread novice, so I always feel a little apprehensive when one is selected. Fortunately, this was an astonishingly pliable dough (no big glutinous mess – yay!) and it was a very positive baking experience. I think if I had made this in one day, I might have felt like it was rather time-consuming, but since the dough rested overnight and just had to be “slapped” a few times the day it was made, I didn’t feel like it was an obtrusive project. There may be more yeast breads in my future. Instead of purchasing both plums and plum jam, I used leftover apricot jam from a recent unblogged apricot galette and bought some apricots. The brioche was nice and tender, and I loved the sweet, gooey fruit on top: an excellent breakfast for a relaxed morning off and even better later in the afternoon when the flavors melded a bit.
 This recipe gets an 8.5 for Deliciousness and 3.5 for Effort, giving it an EDR of 2.42. Many thanks to Denise of Chez Us for selecting this great treat. You can find the recipe on Denise’s site and see what the other bakers thought via the TWD site.
 Last week I posted about using leftover buttermilk and raspberries to make a cake. This week I was pleased to find a second recipe that utilizes nonfat dry milk, which I originally purchased to make Brown Sugar Vanilla Ice Cream for last week’s Sweet Melissa Sunday dessert. And not only does it use up leftover dry milk, it’s a healthy recipe: Energy Bars! After seeing so many great recipes from Ellie Krieger’s The Food You Crave on various blogs, I checked it out of the library and one of the recipes that caught my eye was homemade energy bars. And then this weekend I saw that Leslie of Lethally Delicious had made the bars and was sold.
 The smell of these bars reminded me of shopping at health food stores with my mom when I was a kid – in a good way. And they are wonderful: chewy and crunchy, with just enough sweetness to perk you up and protein to sustain you – the perfect snack. I eat a lot of Luna Bars, but I may not need to anymore; these are super-easy to make and seem like they will adapt easily to different flavor combinations (and what is currently in your pantry). Mr. Penpen is eager to reduce the nutritional value by making them with chocolate and I would like to try a peanut variety, possible together. This recipe gets an 8 for Deliciousness and a 2 for Effort, giving them an EDR of 4.Energy Bars from The Food You Crave via The Food Network (my changes in green)1 cup quick cooking rolled oats 1/2 cup raw unsalted sunflower seeds 1/2 cup toasted wheat germ 1/4 cup whole-wheat pastry flour 1/2 cup dried apricots 1/2 cup raw almonds (roasted pistachios)1/2 cup raisins (dried cherries)1/2 cup pitted dried dates (dried apples)1/2 cup powdered nonfat dry milk1/2 teaspoon ground cinnamon 1/3 cup pure maple syrupDrizzle of honey2 large eggsPreheat the oven to 350 degrees F. Coat a 9 by 13-inch baking pan with cooking spray. Place all ingredients except the syrup and eggs in a food processor and pulse until the mixture is finely chopped. Add the syrup and eggs and pulse until the mixture is well combined. It will resemble a coarse paste. Transfer to the baking pan and spread evenly. Bake until just done, about 20 minutes. Cut into 20 squares.
 This week’s Tuesdays With Dorie treat was Tribute to Katherine Hepburn Brownies. I have to confess, I felt a little sorry for them. You see, there are some weeks when I would have been really excited about brownies (especially almost flourless ones) and these were yummy brownies, but they came in the wake of a lot of other chocolate concoctions, so I didn’t muster up my usual brownie enthusiasm. The flavors of cinnamon, chocolate, and espresso in these brownies reminded me a lot of the Cinnamon Squares TWD made at the beginning of June. I said it then and I’ll say it again – it’s a terrific combination! And due to the low flour content, these are infallible brownies: you can give them a short amount of baking time for a gooey brownie or leave them in a little too long like I did and still have a chewy brownie.
 This recipe gets a 7 for Deliciousness and a 2 for Effort, giving them an EDR of 3.5. Many thanks to Lisa of Surviving Oz for selecting these and designing TWD’s awesome new logo (which I need to figure out how to put on my sidebar)! You can find the recipe on Lisa’s site and see what the other bakers thought via the TWD site. I’m leaving for vacation on Thursday, so I will be attempting to bake next week’s treat in a strange kitchen. Luckily I have a couple rewinds on reserve if it doesn’t work out.
 This week’s Sweet Melissa Sundays treat was Brown Sugar Vanilla Ice Cream. Haagen Daz started selling a brown sugar ice cream earlier this year and we both really like it. I actually haven’t bought any in a while, though, since I’ve been making so much ice cream, so I was happy this recipe was chosen. Aside from the brown sugar, the other ingredient that sets this recipe apart from a standard vanilla ice cream is dry skim milk powder. I was a little skeptical about the milk powder (I have a vague memory of drinking milk made from it and not liking it), but Melissa’s recipes have yet to let me down, so I bought a box of it. (And coincidentally I’ve already found another recipe that utilizes it!)
 Typically when I add ingredients to vanilla ice cream to create more interesting flavors it involves candy or cookies, making it a big, gooey concoction. Those ice creams are delicious, of course, but I love that the simple additions of the milk powder, brown sugar, and two kinds of vanilla (extract and beans) give this ice cream a much more intense flavor than your average vanilla ice cream. We loved this ice cream and I can’t wait to make it again. This recipe gets an 8.5 for Deliciousness and a 3 for Effort, giving it an EDR of 2.83. Many thanks to Karen of Karen’s Cookies, Cakes, and More for choosing this wonderful ice cream. You can find the recipe on Karen’s site and see what the rest of the group thought via the SMS blogroll.
 I think this ice cream would be good with just about anything, but we were in need of portable treats, so I made some blondies. I found this recipe in the June issue of Bon Appetit and it’s a winner too! It calls for all brown sugar, which makes the blondies are nice and chewy, yet still cakey. The recipe is called Chocolate Chip and Peanut Blondies, but I didn’t have any peanuts and I liked the almond chocolate chip combination from a few Sweet Melissa Sundays ago, so I used roasted almonds. This recipe gets a 9 for Deliciousness and a 2 for Effort, giving it an EDR of 4.5.
Chocolate Chip and Peanut (or Almond) Blondies, from Bon Appetit1 cup all purpose flour 1/2 teaspoon salt 1/4 teaspoon baking soda 1/2 cup (1 stick) unsalted butter 1 1/4 cups (packed) golden brown sugar 2 large eggs 1 teaspoon vanilla extract 1/2 cup salted roasted peanuts (or other nuts), divided 1/2 cup bittersweet chocolate chips (about 3 ounces), divided Preheat oven to 350°F. Butter and flour 8x8x2-inch metal baking pan and line bottom with parchment paper. Whisk flour, salt, and baking soda in small bowl to blend. Melt 1/2 cup butter in heavy large saucepan over low heat. Remove from heat and pour butter into a medium bowl; add sugar and whisk until smooth. Cool mixture 2 minutes; whisk in eggs and vanilla. Using flexible spatula, stir in flour mixture, then half of nuts and half of chocolate chips. Spread batter in prepared pan; sprinkle with remaining peanuts and chocolate chips. Bake blondies until golden, tester inserted into center comes out clean, and edges just begin to pull away from sides of pan, about 30 minutes; cool completely in pan on rack. Invert blondies onto a plate and then onto a cutting board. Cut blondies into 16 squares; serve. Store in airtight container for up to two days.
 With all the baking I do, I often have a surplus of ingredients. Obviously, there are things like nuts and jam that don’t need to be used right away, but I attempt – admittedly, I’m not always successful – to use the perishables before they go bad. This week I had some leftover raspberries from the Perfect Party Cake I made for Tuesdays With Dorie (see post below). I enjoy raspberries and would have eaten them plain as a snack or with yogurt for breakfast, but, even after a batch of buttermilk ice cream, I also had some leftover buttermilk from the party cake and I’d had a buttermilk cake on my (never-ending) list of recipes to try.
  This Raspberry Buttermilk Cake was in the June issue of Gourmet (they recently wooed me with a $10 a year subscription and I really like the magazine so far) and I have seen it on quite a few blogs as well. You can find the recipe HERE on Epicurious. (I accidentally baked my cake at 350 degrees rather than 400, which was fine, but it didn’t get nice and crunchy on the top. I guess I’ll have to try it again.) This cake is pretty much the polar opposite of the Perfect Party Cake, both wonderful in their own right. The Perfect Party Cake is tall and elegant, while this one is short and cute (particularly if it’s halved and baked in a six-inch pan like mine). As its name suggests, the Perfect Party Cake, with its rich buttercream and multi-steps, is “perfect” for special occasions, but since the Raspberry Buttermilk Cake is very easy to make and not nearly so rich, you can justify making it any time. It would be a good brunch cake or nice served in the late afternoon with coffee or tea. I brought mine to work and my co-workers seemed quite happy that I didn’t do the healthy thing and eat the berries for breakfast. I gave it a 7.5 for Deliciousness and a 2 for Effort, giving it an EDR of 3.75.


