Sunday, May 31, 2009
SMS: Bee Stings!
This week’s Sweet Melissa Sunday treat was Bee Stings, which Melissa says in the recipe notes were created out of her love for doughnuts, only in a brioche dough form. This is certainly one of the most eye-catching recipes (with a rare photo, to boot) in the book and I was delighted it was chosen only two months into our group’s adventure. In addition to being one the most intriguing recipes, I think it’s safe to say it’s also one of the more time-consuming ones in the book, as thus far, every other one has been fairly easy. I intended to start my dough on Friday evening so we could have the buns for breakfast on Saturday, but that didn’t happen. I then spent most of Saturday doing practical things like cleaning my house and exercising, so I didn’t start the dough until Saturday night at 9:45 PM.
The good news about starting this project so late was that I was able to benefit from the other bakers’ experiences by reading the Problems and Questions section of the Sweet Melissa site, which was definitely helpful, as I’m a novice when it comes to yeast breads. I knew going in that I would need to add extra flour (I ended up adding about two and a half extra tablespoons to my third of a recipe) to the dough and not bake the buns as long as the recipe specified (twenty minutes was perfect). The recipe said that the dough should form into a ball within ten to fifteen minutes; mine took twenty-five. Since I started so late, I used rapid-rise yeast and let them rise for about an hour, though I probably could have gotten away with a little less time. When I did the second rise this morning, I had to add a second round of warm water to the oven and it took about an hour for them to rise. Luckily I had no trouble with the vanilla pastry cream filling – yummy – or the honey caramel glaze – also yummy! Oh, a did have a little trouble getting the pastry cream into the buns; I was scared I would overdo it and they'd ooze, but I ended up not filling them enough.
I think my expectations were a little bit too high. I thought these buns were pretty good, but probably not something I would make again. I am always happy when a SMS or TWD recipe gets me to try new things, though, and I’m glad I got a little more experience working with yeast bread. The honey caramel glaze was delicious and super-simple, so I will definitely be topping other treats with it! I gave this recipe a 7.5 for Deliciousness and a 5 for Effort, giving it an EDR of 1.5. Many thanks to Jaime of Good Eats 'n Sweet Treats for selecting one of my bookmarked recipes. You can find the recipe for Bee Stings on Jaime’s site and see how the other bakers fared via the SMS blogroll.
An Unbaked Treat
If you came here looking for this week's Sweet Melissa Sundays treat, it'll be up a little later. Due to some poor planning, my Bee Stings are currently cooling.
A couple months back I blogged about my first, and so far only, trip to Omnivore Books on Food, a magical new bookstore in San Francisco. They have a lot of author events there, so I put myself on their email list to keep myself aware of any I may want to attend. When I received the May list of events, I noticed one I wanted to attend: Matt Lewis and Renato Poliafito, the authors of Baked: New Frontiers in Baking and owners of Baked bakery in New York City. Unfortunately, the “Baked” event was in the evening, and although I am an optimistic planner, the reality is I rarely feel like staying in the city after work - even to hear the creators of possibly the most awesome brownie I’ve ever baked speak. Fortunately, I pass Book Passage in the San Francisco ferry building twice every weekday (not to mention all the times I go in to browse); I check out their listings, too, and noticed that Matt and Renato would be there at 12:30 pm on a Wednesday. I decided attending that event would be a pleasant way to spend a lunch break.
I went, and Matt and Renato were delightful. They spoke briefly and then encouraged audience questions. It was fairly sparsely attended, so there were only a few questions (including mine). It was fun to hear about their experience of leave their previous professions, opening a bakery (and a second one), writing a book, and rising to baking fame. Here are a few highlights from the event:
• They brought brownies! Seriously, they were FedExed from the bakery in New York.
• Matt and Renato are eternally grateful to Oprah for selecting their brownies as a “favorite” in her magazine one month and increasing their mail-order sales exponentially; they said they have a photo of her in their office. And also to Martha Stewart for featuring them early on.
• They feel that the “American” bakeries have basically evolved into cupcakeries (often with vintage décor), and they wanted to get back to more of a classic bakery with a modern aesthetic. They do like cupcakes in moderation, though, and have some on their menu. (I hadn’t really thought of it before, but in the year – officially tomorrow – I’ve lived in Marin, I can think of three bakeries that have opened and all have been cupcake-centric and not that great. In fact, one is already closed.)
• Matt and Renato admitted to a few missteps in their time as bakery owners and one was called the “chocolate chubby,” which was a chocolate cake made with lard. They said they were a bit deceptive, as they did not specify on the menu that it had lard in it, and there were some upset people when they found out. They also mentioned that non-vegetarians shouldn’t be afraid of using lard, as it creates a delicious cake, and they may put the chocolate chubby in their next book (which is to be about regional desserts).
• The Root Beer Bundt Cake. A couple months back I participated in a bake-along hosted by Megan of My Baking Adventures and Nic of Bakeologie, and we baked the Root Beer Bundt Cake from Baked. Despite having two cups of root beer in the batter, plus another quarter cup in the frosting, the root beer flavor was imperceptible. It was a fantastic chocolate cake, though. I asked if there was a way to get it to taste more like root beer and less like chocolate, as I do want to make it again, but I crave the promised root beer punch. Matt and Renato recommended using a natural root beer with less sugar and more spice, getting your hands on some root beer schnapps, and adding more root beer to the frosting. I definitely want to make this cake again, so I am going to try it with their suggestions. You can find the recipe here on Megan’s site.
• They said that if you have moderate baking skills, they next thing you bake should be their Sweet and Salty Cake.
I would say I have moderate baking skills, and I am anxious to try the cake, but instead I made their Dark Chocolate Ice cream. I’m happy I did, as I had yet to make a successful chocolate-based ice cream, and as Mr. Penpen put, this one is “insanely good.”
Dark Chocolate Ice Cream from Baked, New Frontiers in Baking
8 ounces dark chocolate (60 to 72% cacao), finely chopped
4 large eggs
1 ½ cups heavy cream
1 cup milk
¾ cup sugar
¼ cup dark unsweetened cocoa powder*
Place the chopped chocolate in the bowl of an electric mixer and set aside.** Whisk the eggs in a large bowl until just combined. Mix the cream, milk, sugar, and cocoa powder together in a small*** saucepan and bring to just a boil. When warm, remove from hit and slowly whisk a third of the chocolate mixture into the eggs, whisking constantly. Add the remaining two thirds in separate batches, then return the mixture to the saucepan over medium heat. Whisk constantly until the mixture begins to thicken and reads 170 degrees on a thermometer. Place a mesh strainer over the bowl containing the chopped chocolate and pour the warm mixture through it. Let sit for one minute, then whisk until combined.
Place the mixture in the refrigerator for at least four hours. When thoroughly chilled, whisk again until the mixture is thick and frothy. Freeze the mixture in ice cream maker, according to manufacturer’s instructions, until it looks like a very thick pudding. Scrape into an airtight container and freeze for at least six hours.
*The notes in the book say they initially used King Arthur’s black cocoa for this recipe, which was incredibly intense, so they recommend using only one tablespoon of that brand and three of regular unsweetened cocoa powder. I used Vahlrona, which was the darkest cocoa powder I had on hand, but I’m now dying to try this black cocoa.
**The instructions say to place the chocolate pieces in the bowl of an electric mixer, but they never specify to use the electric mixer, simply to “whisk.” I normally whisk ice cream custards by hand, but I went ahead and used the whisk attachment, since I figured there must be some reason the recipe said to use the mixer bowl.
***The instructions say to use a small saucepan, but I had to switch in the middle. I recommend using a three-quart sauce pan so you have room to stir the mixture.
Tuesday, May 26, 2009
TWD: Chipster-Topped Brownies
This week’s Tuesdays with Dorie recipe was Chipster-Topped Brownies. I think this recipe ties with the Sweet Melissa Sundays brown-out cake, which was a chocolate cake covered with brownie crumble, for most ridiculously decadent combination dessert. If you haven’t depleted your chocolate and butter supply and are in the mood for another fudgy treat, the recipe can be found here on Elyse's Confectionery Creations. Chipster-Topped Brownies are type of concoction that I would normally make a quarter or a third of a recipe just to try it out, but Mr. Penpen was going to see his friends on Saturday night and I figured these would be a terrific follow-up to the cheese steaks they were having for dinner.
After reading the Problems and Questions section on the TWD site, I was a little nervous about how these would turn out; there seemed to be some problems with the cookie dough sinking and/or baking quicker than the brownie layer. The top looked done after about forty-five minutes, but the brownies weren’t even close; I put foil over the pan and baked it for another fifteen minutes. The brownies ended up pretty moist, which isn’t necessarily a bad thing, and I liked the crispy cookie layer. If I ever had the occasion to make these again, I would probably bake the brownies before adding the cookie layer for a more even consistency. These brownies reminded me of the Ben & Jerry’s Ice Cream flavor Half Baked, so I decided I should make ice cream to accompany them. I thought about making vanilla ice cream and mixing in bits of the brownies, but in the “playing around” section of the recipe, Dorie mentions adding peanut butter chips to the cookie layer, so I made Peanut Butter Ice Cream from The Perfect Scoop.
This is the second week in a row that I have liked the TWD recipe more than I anticipated. Unlike Mr. Penpen, who thought I should add peanut butter cups to the ice cream, I am not normally one for over-the-top gooey desserts, but I thought these were delicious. However, they are a bit dangerous to have around, so I am happy I sent most of them out of the house! I gave this recipe an 8 for Deliciousness and a 3 for Effort, giving it an EDR of 2.66. Many thanks to Beth of Supplicious for choosing this fun treat. You can find the recipe on Beth’s site and see what the other bakers thought via the TWD blogroll.
Oh, so not exactly relevant to baking, but to this post: I lost all my process photos. I don’t always take process pictures, but I was baking on a relaxed Saturday afternoon, so I did. I recently acquired a DSLR camera, which I still haven’t mastered, but I have yet to purchase a decent-size memory card. I had a Canon Elph before the Rebel, and I could go for months before filling up my two one-gigabyte cards. However, this new camera eats up memory almost as fast as my dog devours her dinner, so I’m constantly erasing photos and reformatting the cards. Anyway, today I hit reformat, forgetting that I hadn’t transferred my pictures from Saturday to my computer. My devoted boyfriend diligently researched ways to recover the photos and found a couple programs that will do the job. Naturally, the free software he found didn’t work and we’re not about to spend $40 to recover pictures of brownies and our dog: I had a few treats left for the plate shot and Eloise is still cute.
Sunday, May 24, 2009
SMS: Sour Cherry Pie with Pistachio Crumble
This week’s Sweet Melissa Sunday recipe was Sour Cherry Pie with Pistachio Crumble. I typically bake my SMS recipes earlier in the week and bake my Tuesdays With Dorie on Sundays, but I actually made the pie today. I was looking forward to trying this recipe since I enjoy making pies and Mr. Penpen and I are both big fans of crumble topping. My mom rides her bike to work every day, and unfortunately, she was recently in an accident and got pretty bruised up. When I spoke to her yesterday she wasn’t sure if she felt like company, which I totally understand since even if it’s just immediate family it can be stressful (especially when it involves an energetic dog), but she was feeling better today, so we drove down to see her and brought the pie to share.
I’ve noticed that whenever a recipe calls for an obscure ingredient, it elicits a lot of discussion on the Problems and Questions section of the SMS or TWD site. For this round, the ingredient was the sour cherries. Until this week it had never occurred to me that I have never seen a fresh sour cherry here in California. (And really, why would it?) I had sweet frozen cherries, leftover from making this awesome coffee cake, in my freezer, so I used a combination of those and canned sour cherries. When I read the pie recipe, I was pleasantly surprised there was no partially baking the crust or cooking the cherry filling ahead of time, so the recipe came together a lot quicker than most pies I’ve made. I recently got over my phobia of making pie dough, but I still haven’t been adventurous enough to deviate from the first recipe I was successful with, which is Cook’s Illustrated Foolproof Pie Dough, so I used that. At the last minute I almost tried Melissa’s recipe, but I hadn’t frozen quite enough shortening for it, so it will wait for another time.
We all really liked the pie.The cherry filling was sweet but a little tangy, and I appreciated that you could taste the pistachios and the oats in the crumble topping, rather than just flour and sugar. I gave this recipe an 8 for Deliciousness, but Mr. Penpen gave it a 9 and my mom really liked it, so we’ll call it a 9. I gave it a 3 for Effort, giving it EDR of 3. Many thanks to Michelle of Flourchild for choosing this great recipe, which you can find on her site. Michelle is a runner like me, so I think it’s cool that she also blogs about running sometimes. I'm sure there are a lot of running blogs out there, but I already spend enough time reading food blogs, so it's nice when a couple hobbies are combined. And be sure to check out the SMS blogroll to see what the other bakers thought of this pie.
Oh, and on Friday night I made this Buttermilk Ice Cream from Smitten Kitchen to pair with the cherry pie, but since my mom lives an hour away, it did not make the journey to her house. She did have vanilla ice cream on hand, which was wonderful with pie. However, I encourage anyone with an ice cream maker to try the buttermilk ice cream this summer because it is fabulous.
Saturday, May 23, 2009
Orecchiette with Mini Chicken Meatballs
I sometimes feel like this blog makes me look like a really unhealthy eater. I mainly post desserts and most of the dinner dishes that have actually made it up here have been pasta. I think it’s a combination of various factors. We eat dinner quite late, after we go running, so I am usually too tired and ravenous to fuss around taking pictures, and also, a lot of my dinners are kind of boring. I mean, cake and pasta are a lot more fun and photogenic than grilled meat and vegetables. I do greatly appreciate all of the blogs out there that do make them look and sound exciting; I have poached many outstanding dinner ideas, which I will do a round-up of one of these days.
So here I am with another pasta dish: Orecchiette with Mini Chicken Meatballs. You can find the recipe HERE. This was one of the very first dishes I made upon acquiring Giada’s Kitchen last fall and subsequently became one of Mr. Penpen’s most requested dinners. Pasta with meatballs, cherry tomatoes, basil, and LOTS of cheese is not a hard sell. This dish happens to be from the “(Not) Just for Kids” section of the cookbook, and in the recipe notes, Giada encourages you to have your kids make the meatballs. I don’t have children, but the idea of children sticking their fingers in raw meat (with raw eggs!) kind of grosses me out; the potential of salmonella and cleanup of gooey kiddy smearings? Yuck. However, since the meatballs are mini, which is what works with the size of the cheese, tomatoes, and pasta, I do encourage you to have a sous chef, as making them can be tedious. The recipe also does not specify to use flour for rolling the meatballs, but I always use a generous amount.
This is a simple recipe and an incredibly satisfying meal. It’s hearty, and the tomatoes and basil contribute a nice, fresh taste. I read some reviews of it on the Food Network website, and one aptly describes the meatballs as tasting like chicken parmesan. And it makes tons: we both ate it for dinner last Sunday and Mr. Penpen had it for lunch four days last week! I would probably fall asleep at my desk if I ate pasta for lunch, but he does okay. This recipe gets a 10 for Delciousness and a 3 for Effort, giving it an EDR of 3.33.
Thursday, May 21, 2009
Raspberry Chocolate Chunk Ice Cream
Have you ever heard of Dr. Bob’s Black Raspberry Chocolate Chip Ice Cream? I doubt it, because it was nearly impossible to find and I think it is now safe to say it has been discontinued. We bought it at Mollie Stone’s here in Marin two summers ago, and the last time I found it was over a year ago when I took a tour at the now-shuttered Scharffen Berger factory in Berkeley. Mollie Stone’s still carries some other varieties, but Mr. Penpen loved the raspberry flavor and was disappointed when it disappeared. So, of course, I did the logical thing and tried to make it for him myself last summer. It was my first attempt at custard-based ice cream, and the first try was an unmitigated disaster. I think I overcooked the custard, which ended up not mattering because I somehow lost control as I lifted the bowl of custard from the ice bath and it exploded all over the kitchen. Not only did I break my favorite bowl, but six cups of fresh raspberries down the drain is quite an expensive kitchen catastrophe.
I bought more raspberries and persevered the next day, with much better results. Amazing, actually. Since raspberries – regular, not black – are starting to be available at a reasonable price (Costco! They aren’t organic, but they are grown in the United States) and it’s warm out, I decided to make a batch last weekend. I used a recipe for raspberry ice cream from The Perfect Scoop and added chunks of chocolate.
Raspberry Chocolate Chunk Ice Cream, adapted from The Perfect Scoop by David Lebovitz
1 1/2 cups half-and-half (I used whole milk this time and it turned out great)
1 cup sugar
1 ½ cups heavy cream
4 large egg yolks
1 ½ cups strained raspberry puree (from approximately six cups of fresh or frozen raspberries)
1 tablespoon freshly squeezed lemon juice
1/3 cup chopped bittersweet chocolate
Blend the raspberries in a food processor, and then press the puree through a mesh strainer (note: this is a bit messy and I had to rinse the strainer a couple times in the process). Prepare an ice bath in a large bowl. Pour milk or half-and-half into a medium saucepan over medium-low heat to warm. Pour the cream in a large bowl and set a mesh strainer on top of the bowl. In a separate bowl, whisk the eggs and (still whisking) slowly pour the warmed milk over the yolks. Pour the egg yolk mixture back in the saucepan.
Using a heatproof spatula, keep stirring the egg yolk mixture over medium heat until the spatula is coated with the thickened mixture. (Note: The Perfect Scoop has a very helpful section on basic custard-making and also custard recovery.) Next, stir the custard into the cream after pouring through the mesh strainer, then add the lemon juice and raspberry puree, mixing until cool over the ice bath.
Chill the mixture thoroughly in the refrigerator, but in order to preserve the fresh raspberry taste, churn in your ice cream maker within four hours. Five minutes before it should be done according to the manufacturer’s instructions, add in the chocolate.
Tuesday, May 19, 2009
TWD: Fresh Mango Bread
This week’s Tuesdays With Dorie selection was Fresh Mango Bread. I like mangoes; in fact, I have even been addressed as Mango. I suppose you could easily mistake “Margo” for “Mango” when you are looking at an email message. I go by “Margo” rather than “Margot” (my given name) much of the time, since it’s the phonetic pronunciation and easier for people. Seriously, by first grade I was already tremendously frustrated with having to constantly tell people – including teachers – that my name is not “Mar-got” (as in “you got it wrong”) I was totally jealous of all the Jennifers and Sarahs and Emilys. Mr. Penpen did not know the official spelling of my name until our fifth date when Michael Chabon was signing copies of the Yiddish Policemen’s Union for us, and he asked if Margot was spelled with a “t.” When Mr. Penpen replied, “No” and I replied “sure,” Michael Chabon (BTW: his wife also has “difficult” name) thought he might have started a fight since my boyfriend didn’t know how to spell my name. Mr. Penpen writes my name as Margot now, which I like, but I will respond to either. Just don’t call me “Mar-got.”
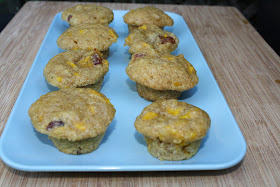
Okay, mango bread time! I can’t say I’d ever seen a recipe that involved both cinnamon and lime zest; they do not seem like natural companions to me, so I was a little wary of this bread. By the time I finally got around to making the bread, I was too tired to think of any alternative spice combinations, so I just went for it. I did omit the raisins, and added dried cherries and macadamia nuts instead. I enjoy raisins in a very limited number of desserts, like oatmeal raisin cookies, so if there is a suitable substitution, I will generally use it. I decided that instead of making bread, I would use my long-neglected mini muffin tins. This proved to be a very sensible decision, since my bread went into the oven at 10:10 on Monday night and the recipe said the loaf was to bake for an hour and forty-five minutes. The mini muffins only took twenty minutes. And made tons: I got twenty-four, from a half recipe, last night and still have batter in the refrigerator.
I ended up liking the muffins more than I thought I would, but enjoyed the leftover mango with yogurt for breakfast even more, which is certainly a good thing. I gave this recipe a 7.5 for Deliciousness and a 2.5 for Effort (it would have been a 2, but it took me a while to slice small mango bits), giving it an EDR of 3. Many thanks to Kelly of Baking with the Boys for choosing this yummy bread and reminding me how much I like mangoes. You may find the recipe on Kelly’s site and check out what the other bakers thought via the TWD blogroll. And there's still one more hour of Tuesday!
Sunday, May 17, 2009
Ginger Overload: SMS Guinness Gingerbread and a Lost Recipe
This week’s Sweet Melissa Sunday recipe was Guinness Gingerbread. I was happy this recipe was selected because I adore gingerbread, but probably wouldn’t have made it again until the winter. I am also always happy when people select recipes in the “Dessert for Breakfast” category of the book, because it means I can justify having cake for breakfast. Since the imminent Tuesdays With Dorie recipe is also a breakfast bread, I decided I would make this earlier in the week (“earlier in the week” was intended to be Monday and ended up being Wednesday) and make the TWD one on the weekend. This baking schedule turned out to be a good decision, since now it’s super-hot here and the idea of making gingerbread is unappealing.
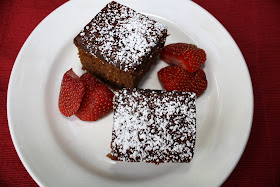
Safeway wouldn’t sell me a single can of Guinness, so I used an IPA (India Pale Ale) that was in our refrigerator; I didn’t want to go on a big single can Guinness-search – or more likely send my boyfriend on one – and I have subbed in lighter beer in another gingerbread recipe with fine results. The other changes I made were omitting the cocoa powder and adding a couple tablespoons of fresh ground ginger: if I’m making gingerbread, I want strong ginger taste! I think the gingerbread came out very tasty. I don’t think it will replace my favorite gingerbread recipe, which is Cook’s Country’s Bold and Spicy Gingerbread, but I definitely enjoyed eating it and it was much better than my average weekday breakfast!
I gave this recipe a 7.5 for Deliciousness and 2 for Effort, giving it an EDR of 3.75. Many thanks to Katie of Katiecakes for giving me an opportunity to make gingerbread before the holidays. If you would like the recipe, go to Katie’s site, and if you would like to see what the other bakers thought of it, visit the SMS blogroll.
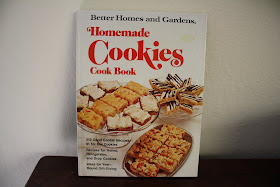
Now for ginger, round two. My mom used to make these ginger cookies with oatmeal in them, that I absolutely loved. They were soft and chewy, with just the right amount of oats for texture. And then, to make a long story short, about eleven years ago the cookbook they came from disappeared in a move and the recipe was lost! I couldn’t remember the exact cookbook it came from (I did know it was an old one) and I spent some time trying to recreate the recipe. I actually had pretty good success with it and they were in my repertoire for a while. Then I lost my recreated recipe at some point and hadn’t been bothered to try again. However, they’re back! One of our local libraries has a used book sale every month and yesterday I found this familiar-looking cookbook – for $ .50, which included a recipe called Oatmeal Gingersnaps. There was also a recipe for something called “health cookies,” which I recall being amused by.
I called my mom to tell her about this miraculous find and she totally remembered the cookies and the cookbook and said, “Yes! It was an all-cookie book.” Despite the fact that it was close to ninety degrees yesterday, I was planning on baking cookies anyway, and these ones jumped to the top of the queue. I just had to confirm if they were “the ones” and if they were as good as I remembered. I am happy to report that they are as wonderful as I remembered them to be. And easy: it’s a one-bowl recipe. I give these gingersnaps a 9 for Deliciousness and a 2 for Effort, giving the recipe an EDR of 4.5.
Oatmeal Gingersnaps, adapted from Better Homes & Gardens Homemade Cookies Cookbook
11/2 cups all-purpose flour
1 cup sugar (I used ¾ white sugar and ¼ light brown sugar)
¾ cup quick-cooking rolled oats*
1 teaspoon baking soda
1 teaspoon ground ginger (I halved the recipe and still used a whole teaspoon)
¼ teaspoon ground cloves
¼ teaspoon salt
½ cup butter (the original recipe called for shortening)
¾ cup molasses
1 egg
Sugar for dusting
Combine the first seven ingredients together in a medium bowl (if you’re using a stand mixer, use its bowl since you won’t be using another). Add in the butter, molasses, and egg, and beat with electric mixer (paddle attachment for stand mixer) for two minutes. Optional: chill the dough (the recipe doesn’t say, but I left the dough in the refrigerator for a couple hours). When ready to bake, pre-heat the oven to 375 degrees. Shape the cookies into approximately one-inch sized balls and roll in granulated sugar. Place cookies on baking sheet and bake for 8 to 10 minutes. They will spread very evenly and be thin but soft. Leave on baking sheet for one minute, then transfer to rack to cool.
*When I tried to recreate the recipe, the oatmeal texture was the most difficult part. I knew they were not overly “oaty” so I never wanted to add too many oats. I hadn’t realized the original called for quick-cooking oats, which have a subtler texture than regular. I would definitely use quick-cooking oats unless you want more of an oatmeal cookie quality.
Friday, May 15, 2009
Magnolia's Famous Banana Pudding
I had wanted to try this recipe for over a year. Seriously, I bought the More from Magnolia cookbook last winter and marked the recipe, which is apparently the most popular dessert at the bakery after Magnolia’s vanilla cupcakes. Then when we visited the actual bakery – twice – on our vacation to New York last May and tasted the banana pudding, the desire to make it myself was validated. But I avoided making it, as it yields a gigantic quantity (serves 12-15!) and calls for an astonishing three cups of heavy cream. However, being in multiple online baking groups has taught me a few things, among them: I don’t need to make an entire recipe and I shouldn’t be afraid of a little heavy cream. So when I had leftover Nilla Wafers and condensed milk from my (mini) SMS Lemon Icebox Cakes, I knew just what I was making. (I did end up having to buy a second box of Nilla Wafers, though, since Mr. Penpen kept snacking on them.)
The combination of bananas, Nilla Wafers, vanilla pudding, and whipped cream pretty much makes this recipe is the epitome of comfort food. It’s delightfully sweet and creamy, and though the instructions say it should be consumed within eight hours of preparation, Mr. Penpen and I were in agreement that it’s even better after a couple days when the flavors have melded together and the Nilla wafers have softened up (just avert your eyes from the bananas, they get a little brown).
The ingredients are one 14-ounce can sweetened condensed milk, 11/2 cups ice cold water, one 3.4-ounce package of instant vanilla pudding, 3 cups heavy cream, one box of Nabisco Nilla Wafers, and 4 cups of sliced banana. You can find the recipe (exactly as in the book) here, on Recipelink. I made a third of the recipe and got five healthy servings out of it. This recipe gets an 8.5 for Deliciousness and a 2 for Effort, giving it an EDR of 4.25.
And that’s a picture of the two of us on a sugar high outside the Magnolia Bakery in Greenwich Village.
Tuesday, May 12, 2009
TWD: Tartest Lemon Tart
This week’s Tuesday With Dorie recipe was Tartest Lemon Tart, a recipe that utilizes an entire lemon (and a half). I had seen this Whole Lemon Tart on Smitten Kitchen a few months back, and like most of the recipes I see there, was intrigued by it, but hadn’t gotten around to giving it a try (again, like most of the recipes I see there). For a moment I thought using a whole lemon sounded peculiar, but then I thought about how often lemon zest is used in baking, and it didn’t seem strange. I was hoping to use Meyer lemons, since they are so sweet and delicious, but I didn’t see any at Whole Foods when I went shopping. They were stocking lemons as I meticulously searched for the perfect ones for my tart, and a produce guy handed me an enormous one – score!
I decided to make an entire tart rather than a pared down version this week and bring it to my book club. Then I remembered there was a birthday at work on Monday, so I decided to bring the tart to work instead, which turned out to be an auspicious decision, as my book club was postponed until next week. I thought it was kind of fun pulverizing a whole piece of fruit in the food processor, and I was amazed at how quickly this impressive dessert came together. From reading the Problems and Questions on the TWD site, I had anticipated the tart being a bit tangier than mine was - I even used a second half lemon in addition to the giant one. In fact, when I had my boyfriend taste the filling, he thought it was too sweet for a lemon dessert, so I added some extra zest.
I thought the tart was good, but not spectacular. On Sunday evening I ran a couple extra miles in order to have some of the Lemon Icebox Cake from my last post, and I don’t think I would do that for this dessert. My co-workers enjoyed it though, and I had fun making it, so overall it was a success. This recipe gets a 7 for Deliciousness and a 3 for Effort, giving it an EDR of 2.33. Many thanks to Babette of Babette Feasts for giving me a chance to hone my tart skills. You can find the recipe on Babette’s site, and see what the other bakers thought of it via the TWD blogroll.
Sunday, May 10, 2009
SMS: Lemon Icebox Cake
First off, happy Mother’s Day to all the moms out there. I was fortunate enough to have the opportunity to see my own mother today, which I hadn’t initially thought was going to happen, so that was great. I don’t have children of my own, but since adopting a dog that seems to believe that it is, in fact, a small child last December, I feel that I have obtained a small bit of insight to what it might be like and have a newfound respect for parenthood. Now on to this week’s Sweet Melissa Sunday dessert: Lemon Icebox Cake, which is basically like a frozen lemon meringue pie with a vanilla wafer crust. This was one of the recipes that caught my eye the very first time I thumbed through the Sweet Melissa Baking Book, so I was happy it was selected.
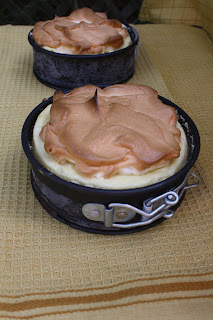
I am also happy to report that it’s an excellent dessert. A couple times I took bites and thought it might be too sweet, but then I’d take another and it would be tart, so overall it was perfect! Since I didn’t know I would be getting together with extended family today, I made a half recipe in two four-inch springform pans, and everything came together nicely. The lemon filling seemed incredibly voluminous, but somehow I managed to pack it all into the pans and it didn’t escape while baking. The original recipe included a strawberry sauce, but I didn’t make it since involved using a food processor and there are only so many times I can be bothered to wash that appliance over the course of a weekend (three so far and I have one more to go). Instead I mixed the berries with some sugar and raspberry balsamic, which was very tasty.
This recipe gets a 9 for Deliciousness and a 2.5 for Effort, giving it an EDR of 3.6. Many thanks to Jennifer of Keep Passing the Open Windows for choosing this fantastic dessert. You can find the recipe on Jennifer’s site and see what the other bakers thought via the SMS blogroll.
Saturday, May 9, 2009
Chocolate Biscotti
I’ve mentioned this before, but sometimes when I get home from work on Wednesdays, Mr. Penpen has the Dining section of the New York Times set out for me if he thinks there is a recipe or article I might enjoy. Last week there was an articled entitled “Treats in the Doggie Bag, for the Dog, of Course,” in which the author envisions Michelle Obama’s doggie bag containing cookies for her daughters, and then, through a somewhat confusing leap of logic, ends up providing a recipe for chocolate biscotti.
I had never tried making biscotti until a couple months ago and I’ve really taken a shine to it. I think I’m partially just enthralled that you can make such tasty cookies using so little butter: this recipe contains just four tablespoons of butter and yields dozens of cookies. It was my first go with chocolate biscotti, and this recipe has a pleasant deep cocoa taste. They were also nice and crunchy rather than hard and dry, so a cup of coffee or tea is not an absolutely essential accompaniment. You can find the article and recipe for the cookie here on the New York Times website. The only deviation I made from the original recipe was the cup of milk chocolate chips. I don’t care for milk chocolate, so I used a combination of semi-sweet chips and chopped almonds. Next time I think I will use hazelnuts, though.
Thursday, May 7, 2009
Hobo Monday: Eggplant, Zucchini, and Chickpea Salad
This month’s Hobo Monday challenge was to prepare a meal with chickpeas, other than hummus. The only other dish I ever make with chickpeas besides hummus is a Warm Butternut and Chickpea Salad with Tahini, which I found on Orangette and have made numerous times. I had wondered how this amazing salad would adapt with other vegetables, particularly eggplant, so I decided this would be a great opportunity to give it a try.
Since I was using eggplant and zucchini rather than butternut squash, I altered the herb in the original recipe from cilantro to basil (parsley would work too, but I wanted something fresh and bright), as well as omitted allspice and added some dried thyme. The results? It was very good, though not quite as wonderful as the original recipe. I think the tahini sauce complements the warm, rich flavor of butternut squash a bit better. This recipe still gets an 8 for Deliciousness and 2 for Effort, giving it an EDR of 4.
And now for the total: $1.99 for the eggplant, $ .89 for the chickpeas, approximately $1.50 for the zucchini, and probably about $ .75 for the tahini, partial onion, and basil. The lemons were free, and the rest of the ingredients are staples. So my total was $5.14 and it yielded three meals (two for dinner and one for lunch) at $1.71 per portion. I went just slightly over budget, but it was an even cheaper lunch than the pre-made salads I usually buy from Trader Joe’s, so I say it was a success.
If you would like to see how others stretched their dollars to create meals with chickpeas for $5.00 or less, there will be a round-up on the Thursday Night Smackdown site on Saturday.
Eggplant, Zucchini, and Chickpea Salad adapted from this recipe from Orangette
1 large eggplant, dried and cut into ¼ inch cubes
2 medium zucchini
2 medium garlic cloves, pressed
1 teaspoon dried thyme
2 tablespoons. olive oil
Salt (to taste)
1 can chickpeas, drained and rinsed
¼ cup of red onion, finely chopped
1/3 cup fresh basil, roughly chopped
Tahini Sauce
1 medium garlic clove, finely minced with a pinch of salt
3 ½ tablespoons. lemon juice
3 tablespoons tahini
2 tablespoons water
2 tablespoons olive oil
Cut your eggplant into round slices, salt, and let sit to dry on paper towels for half an hour. Preheat oven to 400 degrees and cut the eggplant into cubes. Cut the zucchini into similar-sized pieces. Place both vegetables in a large bowl and toss with thyme, garlic, olive oil, and salt. Pour vegetables onto a baking sheet and roast for approximately 25 minutes or until tender. Remove from the oven.
While the vegetables are roasting, chop the onion and basil and make the tahini sauce. Whisk the garlic and lemon juice together in a small container (I like pyrex measuring cups for sauces), and then stir in the tahini, water, and olive oil.
Combine the roasted vegetables with the chickpeas, basil, and onion in a large bowl. You can dress the entire salad, but since I knew there would be leftovers, I dressed each portion individually.
Tuesday, May 5, 2009
TWD: Tiramisu Cake
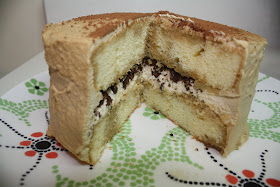
Tuesdays With Dorie begins the month of May with Tiramisu Cake, which is exactly what it sounds like: tiramisu made with a spongy cake rather than with the traditional ladyfingers as the base. I was going to make a quarter recipe in my trusty four-inch cake pans, but Mr. Penpen thought it was blasphemous to make such a small quantity of a dessert he was destined to like, so I made a half batch in my new six-inch pans (which I accidentally tried to pay for with my library card). He did have a valid point, as he consumes an estimated eighty percent of the cake around here and tiramisu is invariably delicious.
I am pleased I ended up going with the larger size for two reasons. 1) Making it resulted in us eating dinner at 10 o’clock on Sunday. I underestimated how long it would take me to put everything together and frost the cake (I’m not the most adept cake-decorator) while simultaneously cooking dinner. 2) Mr. Penpen loved it! He said it would definitely go in his TWD top five, which makes me happy. This recipe gets a 10 for Deliciousness and a 4 for Effort, giving it an EDR of 2.5.
Many thanks to Megan of My Baking Adventures for choosing this top five dessert. You can find the recipe on Megan’s website, in addition to lots of other great dessert and dinner ideas. She has an outstanding kitchen output on her main site, plus a supplementary blog devoted to brownies. How awesome is that? And be sure to check out the TWD blogroll to see what the other bakers thought of this treat.
Sunday, May 3, 2009
SMS: Strawberry Shortcake
I’ll get to shortcake in a moment, but is anyone else excited about the movie “Julie and Julia?” I think it looks like a charming summer movie. The movie is merging Julie Powell’s Julie and Julia with Julia Child’s memoir, My Life in France. Although I read Julie’s book, I think it reads better as a blog, and you can find the Julie/Julia project here. As far as I know, Julie Powell was the first to “cook a book” and blog about it. Her book inspired me to buy a copy of Mastering the Art of French Cooking, which, sadly, I rarely use for fear of too much butter. My Life in France is a good read too, in regard to both cooking and the process of publishing a cookbook.
Okay, so on to Strawberry Shortcake, this week’s Sweet Melissa Sunday selection. You really can’t improve upon the combination of strawberries and whipped cream, so the component that made this recipe a winner was the shortcake. I had never made shortcake before, and when I have been served “strawberry shortcake,” it has more commonly been with a pound cake. I was pleased that this recipe produced a tender, sweet biscuit, with a nice sturdy crumb to hold the macerated berries and whipped cream. And not only is the shortcake delicious, it is amazingly quick and simple to put together. I made it on Friday night when I had a couple of other kitchen projects going, which isn’t always a great idea (not that it stops me), but this was a trouble-free and worthwhile endeavor.
Many thanks to Wendy of Pink Stripes for choosing such a great seasonal recipe. You can find the recipe on her site, not to mention loads of other great treats. Seriously, she makes impressive things like croissants and morning buns (which I have been trying to get up the nerve to attempt for weeks) and everything is always exquisitely presented. And if you would like to see what the other members of Sweet Melissa Sundays thought of these, you can via the SMS blogroll.